



Click here to get my FREE Claude course (20+ lessons)
Did you know?
33% of interviewers make a decision in the first 90 seconds.
Around 50% of candidates use AI to prepare their applications.
The other 50% are walking in at a disadvantage.
Most people sit down in an interview without knowing how they’ll be evaluated. That’s a big problem.
Today we’ll fix that. This guide is split into two parts:
Part 1: How to use Claude to decode any job description, map it to your experience, and answer common questions without rambling
Part 2: How to build a clean, ATS-friendly resume in Overleaf without fighting Word's formatting (Claude does the heavy lifting)
The Prompts to Use
Here are 7 prompts to start with:
1. Resume Conversion Optimization
   "Here is my current resume: [paste]. Rewrite it to maximize interview invitations, using quantified results, strong action verbs, and formatting optimized for applicant tracking systems (ATS)."

2. Professional Fit Analyzer
   "Here is my professional background: [paste experience]. Analyze it and list 10 well-paid roles I am qualified for, ordered by salary potential and market demand."

3. Resume-Job Match
   "Job description: [paste job posting]. Resume: [paste]. Compare both, identify missing keywords, and rewrite my resume so it scores above 90% in ATS systems."

4. Interview Simulator
   "Role: [paste job posting]. Create 15 realistic interview questions based on this role and generate sample answers that sound confident and natural."

5. Portfolio & Proof of Skills Builder
   "Role: [insert]. Generate 3 project ideas or portfolio examples I can build this week to prove my skills to employers and quickly increase my credibility."

6. Salary Negotiation Script
   "I just received a job offer of [amount]. Write a professional, confident script to negotiate a 15-20% salary increase without sounding pushy or arrogant."

7. Recruiter Follow-Up Message Generator
   "Recruiter name: [insert]. Role: [insert]. Write a short follow-up message that reinforces my fit for the role and keeps me top of mind for the recruiter, persuasive but respectful."
Here’s how I use these types of prompts.
Part 1: Prep for the Interview with Claude
Before you prep any answers, you need to know what you're actually being evaluated on. Follow these 3 steps before walking into the room.
Step 1: Understand what the role really wants
Most people read job descriptions like they’re just information. That’s the mistake.
It’s actually a filter. It tells you exactly how you’ll be evaluated during the interview.
The problem is, job descriptions are usually full of noise. Instead of decoding it yourself, let Claude do it.
Do this:
Open any job posting on LinkedIn, Indeed, or another job site.
Copy the full job description.
Paste it into Claude.
For this example, I used a Digital Marketing Manager job description.
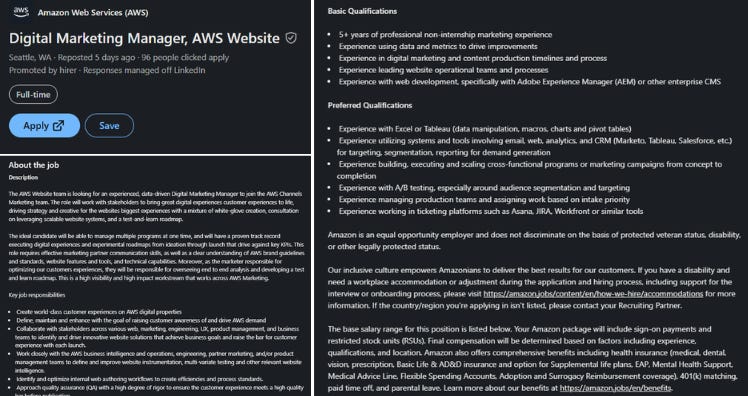
Now use this prompt:
You are a senior hiring manager with over 20 years of experience.

From the following job description, identify:

1. The 3 most important responsibilities
2. The key skills required
3. What success in this role looks like

Be concise and practical.

<paste job description>
In seconds, Claude gives you back the only things that matter:
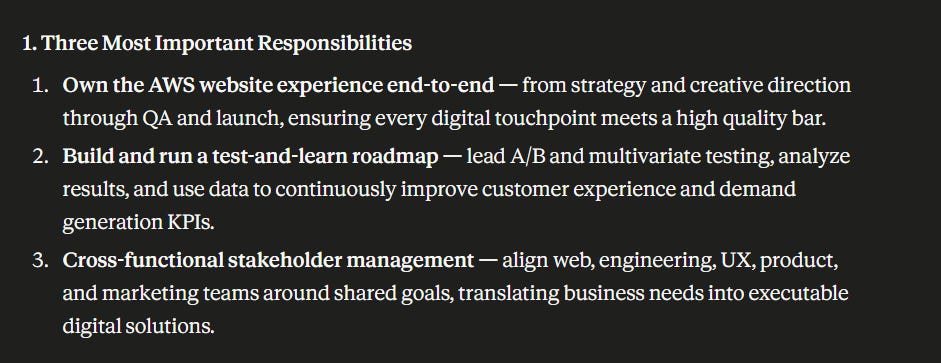
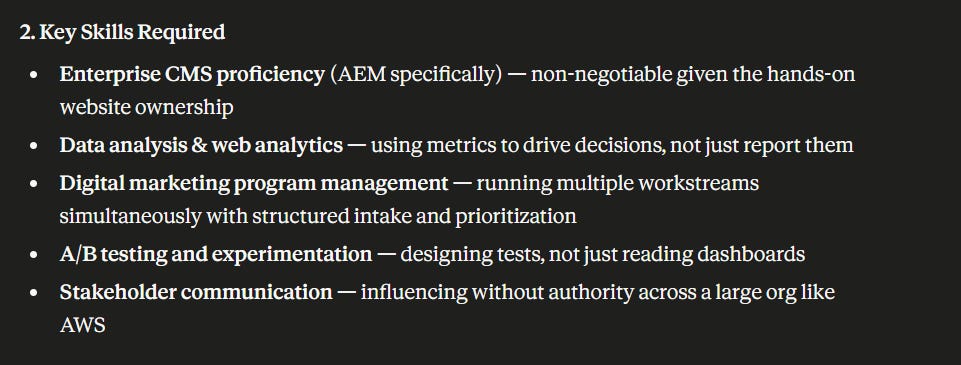
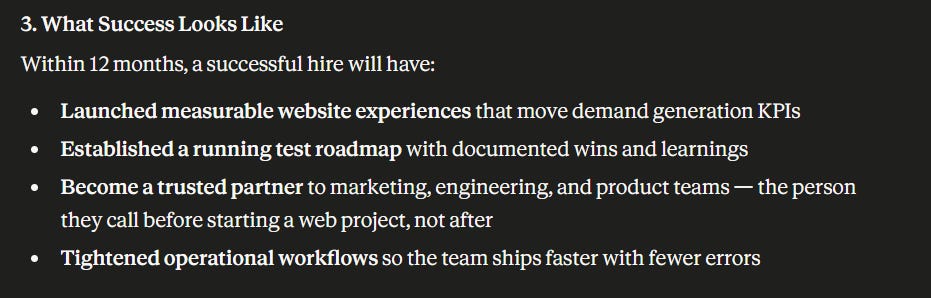
Why this works: it cuts through the noise and shows you the exact criteria the recruiter will use to evaluate you.
Step 2: Connect requirements with your own experience
This is where most people get stuck.
They see what the role asks for and immediately start doubting whether they’re a good fit. Or they go back to research more.
What you actually need is a connection between the role and what you already bring.
Do this in the same chat:
Attach your resume, CV, or copy your experience.
Use this prompt:
Now, based on the job requirements, map them to my experience.

Here is my CV / background:

[Paste your CV or relevant experience here]

Show clear connections between my experience and the role.
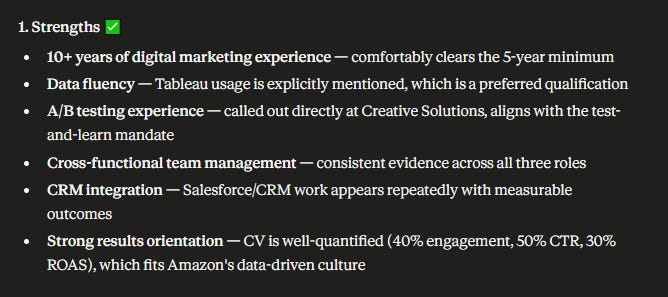
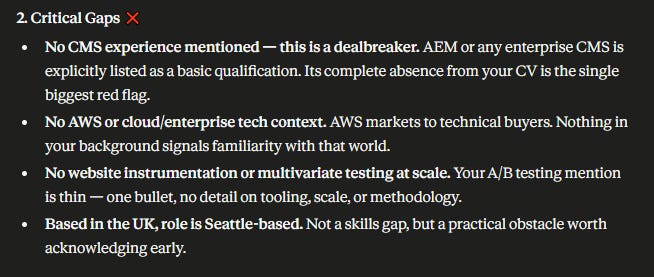
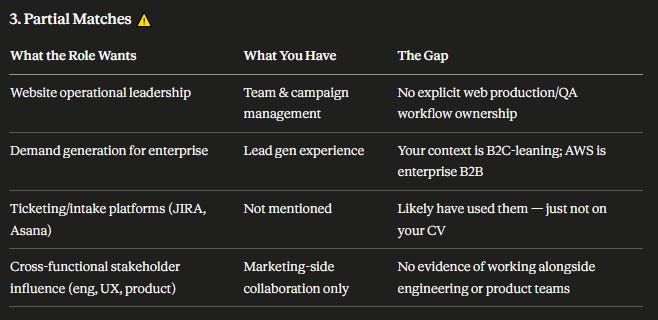
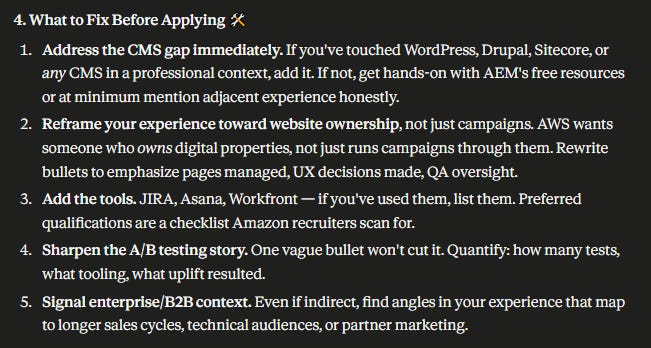
And you get this:
Don’t just read the analysis, use it:
Strengths → build your core message around these.
Critical gaps → prepare how you’d address them (don’t skip this part)
Partial matches → work on how you explain them.
Recommendations → adjust your CV before you apply.
Why this works: you stop guessing and start connecting your experience to what the role actually needs.
Step 3: Build your answer with the Present-Past-Future Framework
“Tell me about yourself” sounds like an easy question. Most people wing it.
They end up telling a timeline: where they studied, what they did next, where they are now. By the end, the interviewer still doesn’t know why you’re sitting in front of them.
What they’re actually looking for:
→ Who you are now (present)
→ How you got there (past)
→ What you can contribute (future)
Do this in the same chat where you already analyzed the role:
Attach your CV, if you have not done it already.
Use this prompt:
Using the job requirements and my CV, create a strong answer to:

“Tell me about yourself”.

Structure it clearly into:

- Present (who I am now)
- Past (relevant experience)
- Future (why I fit this role)

Keep it concise, impactful, and tailored to the position.
And you get this:


Why this works: Claude structures your answer the way interviewers expect it, so you don't have to figure it out on the spot.
A few things worth keeping in mind
Claude gives you precise output. Treat it as a starting point, not a script to memorize.
Claude will likely flag a few gaps. That’s actually the most useful part: you already know what might come up, so you can prepare before you’re even in the room.
Most of the skills you already have are transferable. What matters is how you connect them to what the role actually needs.
Positioning matters more than a perfect profile. Knowing how to present what you already have is what sets you apart from other candidates.
Click here to get my FREE Claude course (20+ lessons)
Part 2: Build a Clean, ATS-Friendly Resume with Overleaf
Why use Overleaf instead of Word?
To create a simple resume that looks polished (and easy to edit in the future!)
Indeed and MIT recommend simple formatting because ATS systems can misread anything too visual.
Here’s where Overleaf helps.
A simple Word resume gets messy fast. Uneven spacing. Broken margins. Inconsistent bullets. Awkward line breaks every time you edit one section. A simple Overleaf resume keeps the layout precise and consistent automatically (no manual fiddling every time you tweak something)
The result? A resume simple enough for machines and polished enough for humans.
Step 1: Choose an Overleaf Template
Here is a gallery of hundreds of resume templates.
Select any. You’ll see 3 options: Open as Template, View Source, and View PDF.
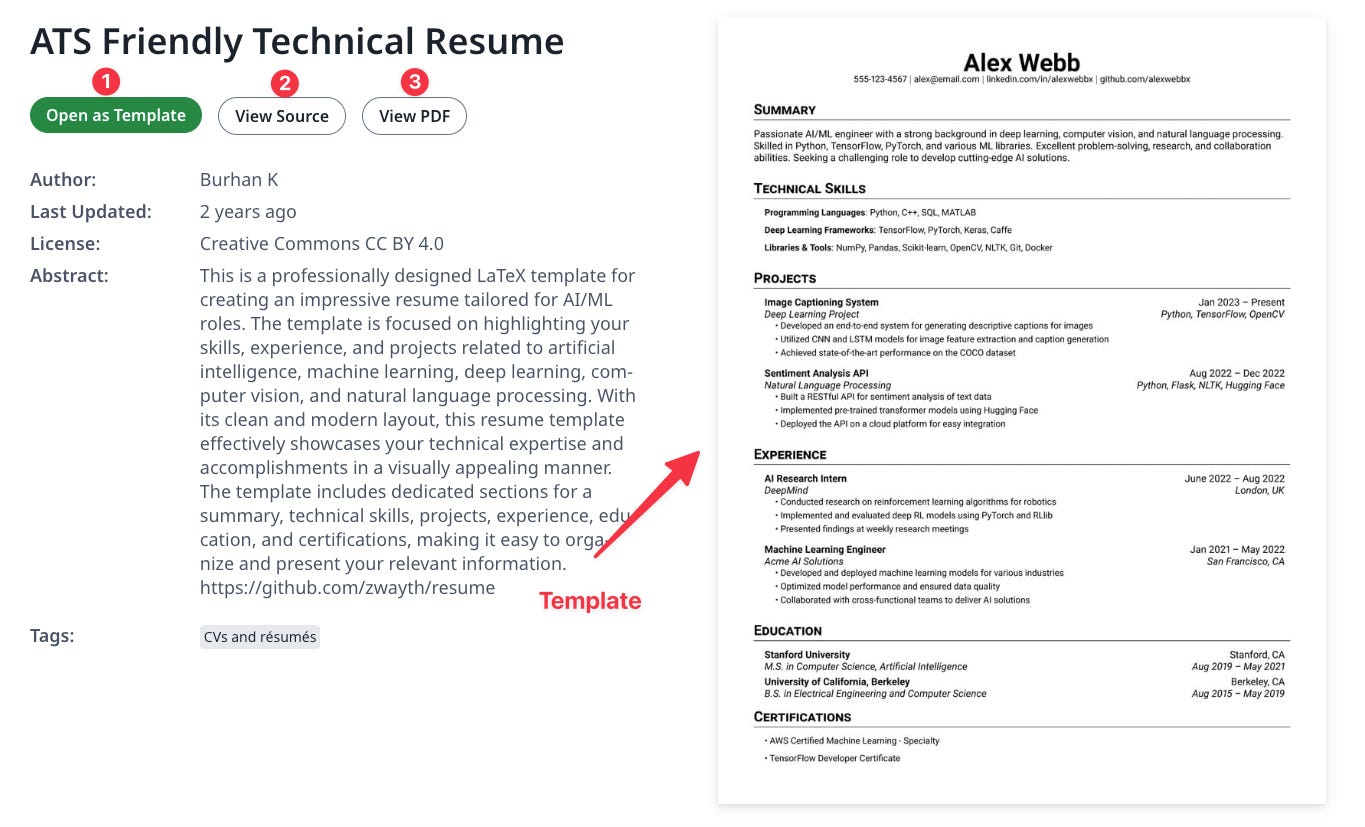
To make our own resume, we choose “Open as Template.”
In case you have an Overleaf account, you will be redirected to the editor, but if you don’t have one, you will see the login page. Just register using Google (or the option you prefer) to be redirected to the editor.
After logging in, you will see something like the image below.
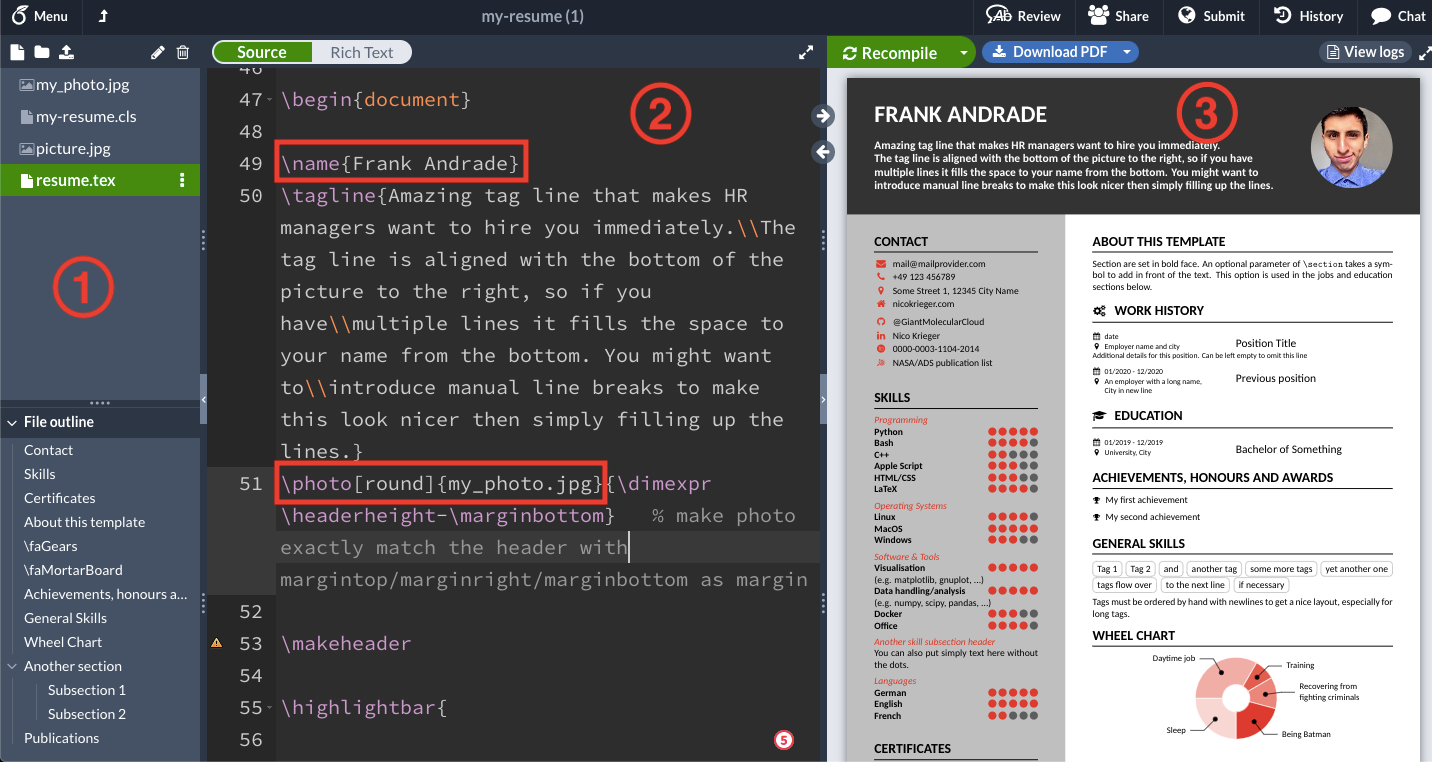
The resume example I’m using in this guide is overdesigned. I’m using it because it’s great for showing what’s possible with Overleaf (it’s not what I’d send to a recruiter).
For ATS-friendly resumes, check out these templates: Option 1, Option 2, Option 3.
Overleaf has 3 main parts:
The left-sidebar: Here we manage all the files used to create the resume. Most templates will have 3 default files: A .cls file (I almost never change anything here, but it has to be there for the template to work), a .tex file (here’s where we put all our data to modify the template), and a .jpg file (only if the template includes an image)
The source section: This is where the code that generates the template lives. You don't need to know how to code to edit it. Just paste the code into Claude, describe your changes in plain English, and Claude will return the updated version for you to copy back in.
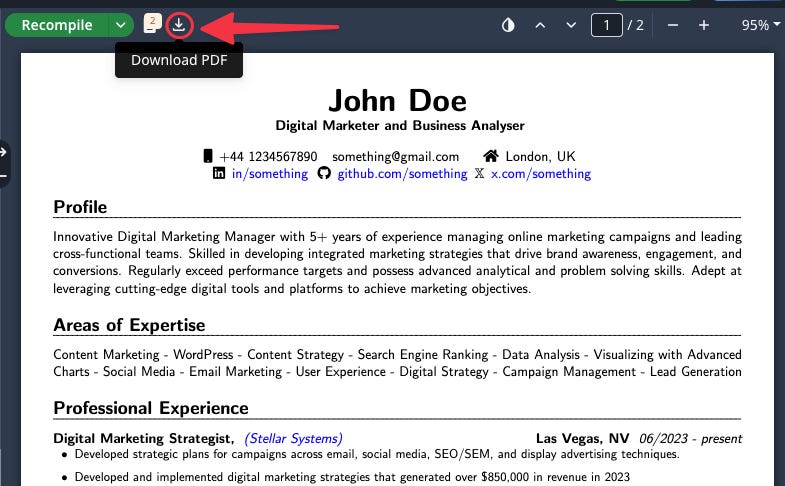
The preview section: Here, you can see a preview of the resume you’re building as you make the changes. Just click on the “Recompile” button to run it. When you’re done, click on “Download PDF” to download the final resume.
Step 2: Edit The Template
The programming language Overleaf uses to generate the resumes is LaTeX.
You don’t need to learn LaTeX. Just tell Claude what you want to edit and ask for the code.
Let’s see how to edit the templates in Overleaf.
How to find a specific section
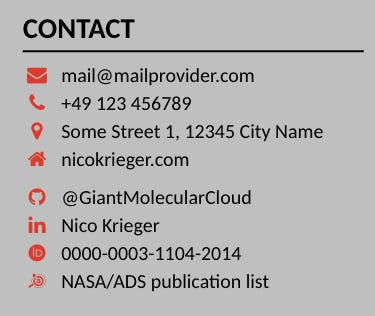
Say you want to edit the contact information in the resume. To locate the code that represents this section, open the source section, press CTRL+F, and write “contact.” You will see something like this;
\highlightbar{\section{Contact}

    \email{mail@mailprovider.com}
    \phone{+49 123 456789}
    \location{Some Street 1, 12345 City Name}
    ...\section{Skills}
Inside curly braces, you can type your own data or paste the code Claude gives you.
Add icons
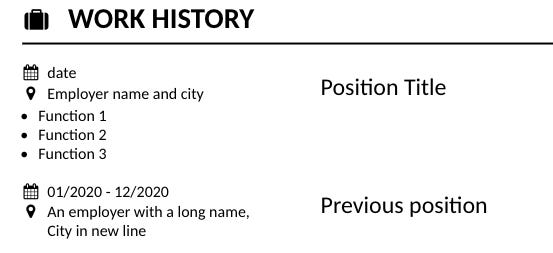
You can add or change the icons used in the templates
Here you can find a list of all icons available on Latex with their command (use Ctrl+F to search for a specific icon)
Say you want a suitcase icon: go to the list of icons, press Ctrl+F, type “suitcase“ and you’ll find the command \faSuitcase.
\section[\faSuitcase]{Work history}
    \job{date}
         ...
Remove sections
If there’s a section in the resume that you don’t need, just delete its code to remove it.
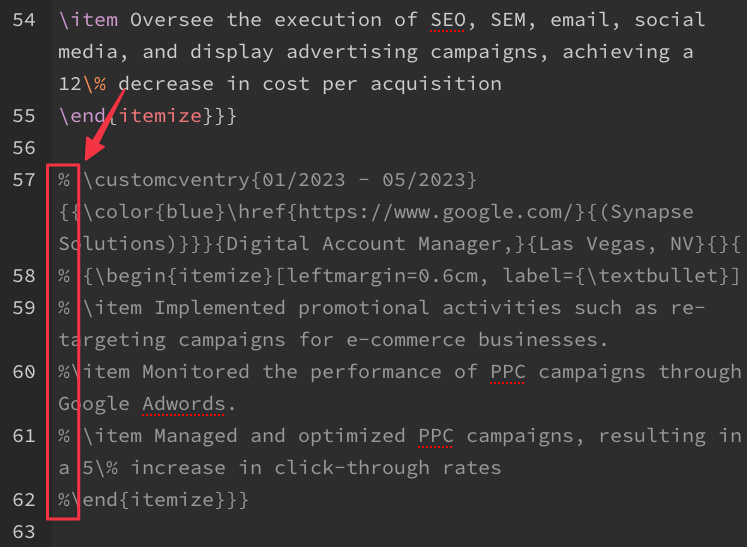
You can also add the percentage sign % at the start of the line to hide the code without deleting it.
Step 3: Download the Resume
Once you’re happy with the resume, download it by clicking on the “Download PDF” button.
That's it! The best part? Next time you need to update your resume, just tell Claude what you want to change and paste in the new code it gives you. No more wrestling with formatting!