
How to Create Your First AI Agent (for Non-Coders)
A comple guide to create an AI Agent for beginners.


For many people, building their first AI Agent can seem like a challenge. The first thing that often comes to mind is that it involves a lot of coding. While that’s true, there's also the option to create an agent using low-code platforms. These are usually more intuitive and provide a faster way to understand how an agent works, without requiring a heavy coding background.
In this guide, we’ll build our first AI Agent using the best tool: n8n
In this beginner tutorial, we’ll create an AI Agent that can send us an email with information about five cryptocurrencies. Later on, we'll see how we can also chat with the agent and ask it to retrieve information it has generated.
Let’s get started!
Table of content:

- Step 1: Set Up Your Workspace
- Step 2: Add the AI Agent and Configure Its Brain
- Step 3: Connect External Tools for Automation
- Step 4: Teach Your Agent and Launch
- Step 5: Handle Common Errors
- Step 6: Run and Interact with Your AI AgentHere’s the link to the n8n platform. The first thing to do is create an account. Once you're in, we'll start by creating a new project.
Step 1: Set Up Your Workspace

We’ll customize things later based on the type of development we plan to do.

To start, go to the Workflows tab and select Start from scratch.

Click on Add first step. A list of available triggers will appear. Choose “On a schedule”
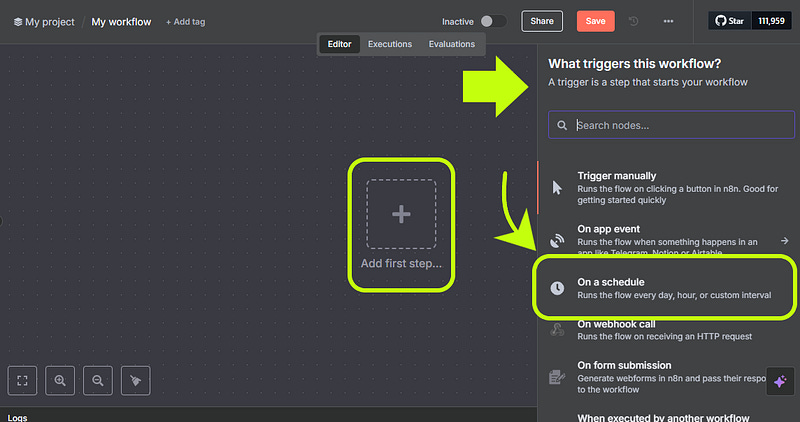
This trigger lets you set how often the workflow should run, based on your preferred schedule.

Step 2: Add the AI Agent and Configure Its Brain
Next, click the plus icon (+) to open the options menu. For this project, choose AI, and then select AI Agent.


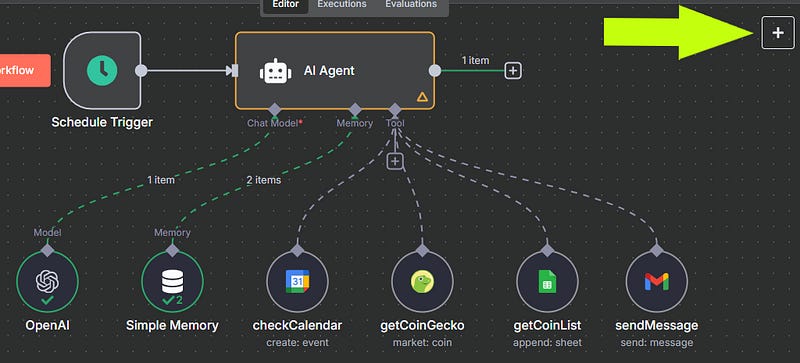
Once the AI Agent node is added, you’ll see a few different sections. On the left side is the input to the node. In some workflows, this could be the output from a previous step, but in our case, it’s coming directly from the trigger we just set up. On the right side is the output, which will be passed to the next node once this one finishes. In the center, you’ll find the parameters and settings where you can configure the behavior of the agent.

Back on the canvas, you’ll notice the trigger is now connected to the AI Agent node. These connections between nodes can be adjusted at any time. You can remove them or create new ones depending on your workflow. The AI Agent node lets you set up the LLM (Large Language Model) you want to use. n8n provides three key components to work with here: Chat Model, Memory, and Tool.

Click the plus icon (+) next to the Chat Model section. A panel will appear on the right side showing the list of available LLMs. From there, you can choose the one that best fits your project.

There are a variety of models to choose from, depending on the goals of your workflow. For this project, I’ll go with OpenAI, which provides free usage credits if you’re new to n8n.
Using OpenAI also gives you access to several models. For this example, we’ll use GPT-4 mini.

At this point, the core of your project is in place.
Next, we’ll configure memory for the workflow. Click on the Memory node. On the right side, you’ll see a list of options. Choose Simple Memory, which works well for the kind of setup we’re building.

In simple terms, the Memory setting tells the LLM how many previous messages it should remember during the workflow.

Step 3: Connect External Tools for Automation
Next, we’ll configure one of the most important parts of the project. In this section, each sub-node connected to the AI Agent will act as a tool. Click on the Tool node to bring up a list of available options. Depending on the nature of your project, you can choose the tool that best fits your needs. For our workflow, we’ll start with the Google Calendar Tool.

To connect it, we’ll create a set of credentials quickly and securely.
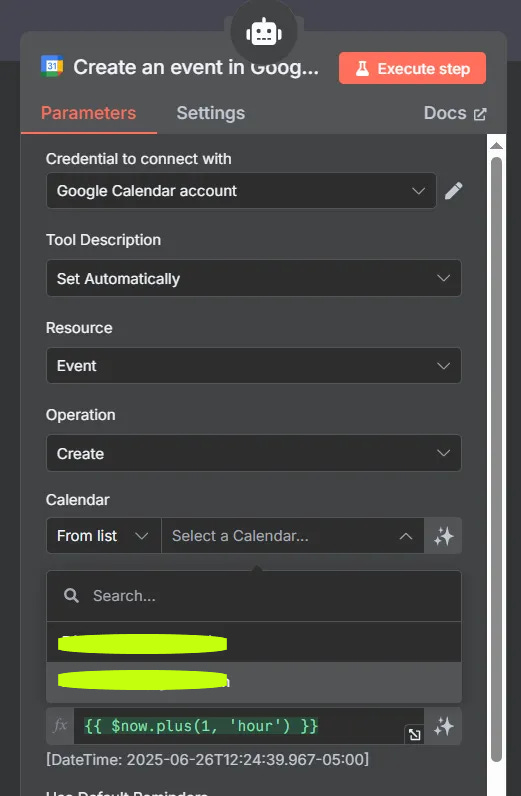
Once that’s done, the first tool will be successfully linked to the workflow.
To pull real-time market data for cryptocurrencies, we’ll also add the CoinGecko Tool.

In this case, we want to focus on just five cryptocurrencies. We can set that limit directly in the configuration or specify it in the prompt we’ll create later.
Since we’re focusing on five coins, we’ll enter the following values under the Coin IDs field:
bitcoin, ethereum, tether, binancecoin, solana

The next step is to connect a Google Sheets document. We’ll add another tool under the AI Agent node.

Credential setup will follow the same steps we used with Google Calendar.
The spreadsheet will be organized based on the data we plan to collect from CoinGecko. It will include the date of the query, the name and symbol of each coin, the price, market cap, and 24-hour percentage change. This table will update regularly with the most recent data.

After naming the spreadsheet and the tab where the entries will be stored, we’ll set those details in n8n.

Now it’s time to add the Gmail Tool.
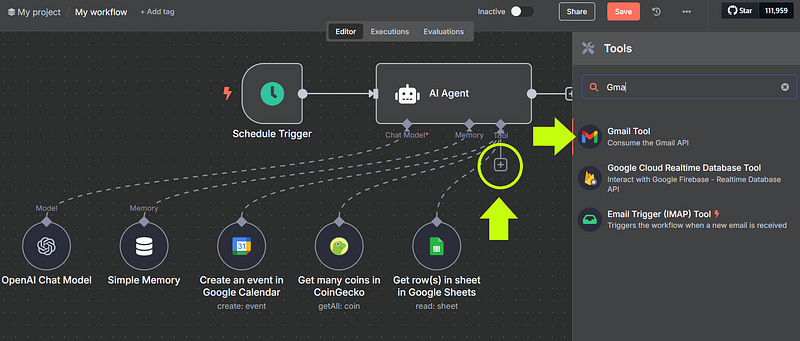
We’ll use the same credentials already configured for Google Calendar and Google Sheets. You can also define the recipient email address. In this case, I used n8n’s built-in AI to help generate the subject line and message content

Step 4: Teach Your Agent and Launch
Next, we’ll define the structure of the entire workflow. This will guide the AI Agent by outlining the exact scope and purpose of the project. To do that, we’ll write a well-defined prompt that follows best practices. Here’s an example of what it might look like:
Persona:
You are a helpful assistant for a non-technical user who wants to stay informed about the daily status of the cryptocurrency market without needing to browse financial websites.Task:
Your task is to retrieve and interpret data about the top cryptocurrencies (Bitcoin, Ethereum, Tether, Binance Coin, and Solana), which is collected every day through the CoinGecko API and saved into a Google Sheets document.The sheet contains the following columns:
- Date
- Name
- Symbol
- Price (USD)
- Market Cap (USD)
- 24h Change (%)Each day, a scheduled automation retrieves this data, formats it, and appends it to the sheet. You should use this data to generate a brief summary report.
Tools available to you:
- `getCoinGecko`: retrieves live cryptocurrency market data (price, market cap, 24h change) from CoinGecko.
- `getCoinList`: appends a new row of formatted data into the Google Sheet named “Cryptocurrencies”, tab “currencies”.
- `sendMessage`: sends a daily summary message via email.
- `checkCalendar`: schedules or reviews upcoming tasks (optional).
- `Simple Memory`: stores context and parameters across executions.Boundaries:
- You do not provide investment advice, predictions, or financial analysis.
- You only work with the top 5 coins: Bitcoin, Ethereum, Tether, Binance Coin, and Solana.
- If market data is missing or invalid, state that clearly and suggest re-running the query.Expected Output:
- Clear and concise
- Written in plain English
- Based on the **latest available data**
- Format example:
“As of June 26, 2025, Bitcoin is priced at $61,700.15 with a 24h change of +2.13%. Ethereum is at $3,450.78 with a -1.20% change in the last 24 hours.”Additional instructions:
- Use CoinGecko’s `Market` endpoint with USD as base currency and coin IDs: bitcoin, ethereum, tether, binancecoin, solana.
- Pull the data via `getCoinGecko`, append each row via `getCoinList`, and use the latest data to compose a readable report.
- Send the final summary with `sendMessage`.If everything runs correctly, produce only the final summary message text to be sent by email.
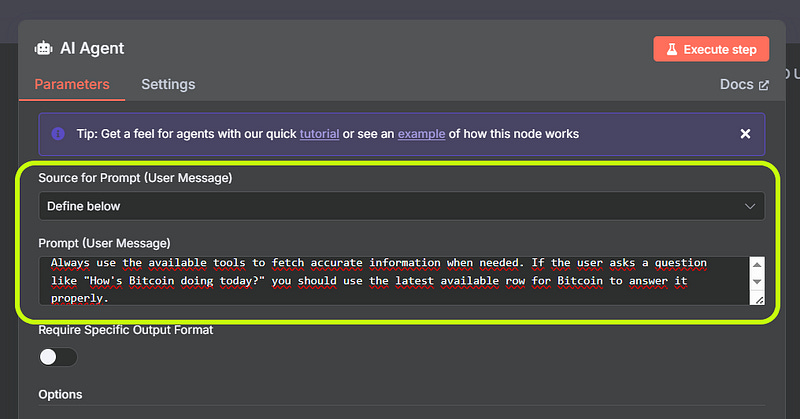
Now, just copy and paste this prompt into the AI Agent

To customize the agent, select the Define Below option. In the Prompt field, paste the full prompt we created earlier.
Step 5: Handle Common Errors [Optional]
Chances are, you’ll run into a few errors along the way. When that happens, it can be really helpful to ask an AI tool like ChatGPT, Gemini, or others for support. They can help you troubleshoot and quickly understand what’s going wrong.
For example, when running the workflow we just built, you might see an error like this one:

In this case, the issue is related to the Simple Memory node.
To resolve it, you’ll need to configure it with the key crypto_user_daily. This tells the system to generate a dynamic ID during each execution.

Once that's set, run the workflow again. This time, the error should be resolved.
Step 6: Run and Interact with Your AI Agent

And now you’ll get the expected result:

At this point, you’ve successfully created your AI Agent.
From here, you can continue enhancing it by adding more capabilities or actions, depending on what you want the agent to do.
You can also enable a chat interface so you can interact directly with your AI Agent.

To do this, turn on the Chat feature and connect it to the AI Agent node.

Now you can start asking the agent questions based on the information it generates. Pretty cool!


Thank you - easiest explanation I could find!